
If Yes (the tick button) is selected then an icon appears on
the left of the dispense screen.

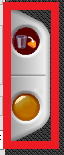
This  icon indicates that the Return
vessel is being used. The dispense is
set as a top up and all other materials will be dispensed on top of the
existing Return.
icon indicates that the Return
vessel is being used. The dispense is
set as a top up and all other materials will be dispensed on top of the
existing Return.
icon indicates that the Return
vessel is being used. The dispense is
set as a top up and all other materials will be dispensed on top of the
existing Return.
If the operator wishes to pour the Return into another
vessel instead then they can click on the button next to the icon and it will
change to a different icon of the Return being poured.

The dispense changes from a top up to a regular dispense and
the manual dispense symbol appears next to the Return.

Summary
 |
Use the Return vessel and top up all
materials into this vessel
|
 |
Use an empty vessel and pour the
Return into it
|