Showing posts with label CPC. Show all posts

Tuesday, 18 June 2019

ColorPoint Console - Toggle how Return is dispensed


When using a Return in a dispense, if one of the Returns can be used entirely the system asks whether you wish to use the Return vessel as the dispense vessel. 


If Yes (the tick button) is selected then an icon appears on the left of the dispense screen.


This icon indicates that the Return vessel is being used.  The dispense is set as a top up and all other materials will be dispensed on top of the existing Return.

If the operator wishes to pour the Return into another vessel instead then they can click on the button next to the icon and it will change to a different icon of the Return being poured. 


The dispense changes from a top up to a regular dispense and the manual dispense symbol appears next to the Return.


Summary

Use the Return vessel and top up all materials into this vessel
Use an empty vessel and pour the Return into it


Monday, 24 October 2016

New Console feature : Stop Weight


Following customer feedback, we have added a new feature to the console which allows the operator to define a Stop Weight. This is a weight value set against a tank. When the tank weight is at or below this weight OR the dispense you are trying to make will take the weight below this level, the dispense will be prevented until the tank weight is above the Stop Weight.

The main use case for this feature is to provide a “hard stop” to prevent stock from going below an acceptable minimum level. This is useful in scenarios where strict stock control is in place and the stock must never go below a defined amount, generally zero, however there is sometimes the need to ensure there is a minimum amount of stock in the tank that is above zero.

The feature is used as below:

To access the setting, go to the Supply Vessel Contents page (M005), select the desired tank and click Edit. You will see the below screen:

image

The default value of Stop Weight is not set, which means that dispensing will never be stopped regardless of weight. This behaviour is how the console worked prior to this feature being added.

To set it, just select the field and enter a weight using the on-screen keyboard:

image

Once this has been set, if an attempt is made to dispense while the tank is below this weight or where the requested dispense amount will take the tank below the set amount, the stop icon will appear in the warning panel:

image

To proceed with dispensing, go to Supply Vessel Contents page and refill the tank so it is above the Stop Weight level. Dispensing will then be permitted to continue as normal.


This feature is available in version 1.9.34 and higher. If you are under a support contract that includes software updates, you can get this update for free by contacting support@rexson.co.uk.

If you are not under a support contract, contact sales@rexson.co.uk for a quote.

Monday, 23 May 2016

Splitting a dispense or issue between multiple jobs


It is sometimes desirable to take a dispense or issue that has been booked against one job and re-allocate part of it against a different job, for instance if there is material left in a press sump that you want to allocate to the next job to run.

Below are instructions to carry out this action:


There are two different options to split a Dispense or Issue.

Split to matched jobs


Will only allow splitting to jobs that have the formulation that was in the dispense or issue.

Split


Will allow booking to any job even if it does not contain the dispensed formulation.

 Clicking either option will summon the below dialog:


You click the Add button to add the jobs and screens that you wish to split the dispense between.

There are 3 options for splitting

Manual – User enters how much should go in each job.

Estimated – Set the weight for each job to the remaining estimated for that job.

Weighted Estimate – Allocate the dispense between selected jobs proportionally based on the estimated requirements for each job.


Click


to remove a job from the dialog.

Friday, 29 April 2016

Changing a Return’s Vessel

By default when you book back a return, the return takes the vessel from the original dispense. In some situations this is not practical, so there is now a feature on CPC that allows you to select the vessel during the return booking in process.

While on the return booking in screen (R003), there is a new button on the left side which allows the operator to cycle through the available dispense vessels, from smallest capacity to largest capacity. The current vessel capacity is displayed at the top of the screen. The selected vessel will be saved as the return’s vessel when pressing the save button.


This feature is available from version 1.9.20, upgrade is free for all customers with a remote support contract. Contact Rexson to arrange an update.

Tuesday, 25 November 2014

Using prompted mode for manual additions


When performing manual additions requiring very precise small amounts of material, it is possible that the movement of the scale to get to the bucket causes the weight to alter before adding any material.

To keep the process as accurate as possible, prompted mode was introduced.

When the next item to be dispensed is a manual addition, the user is prompted to pull out the scale, then press continue when the weight is stable.

image

This ensures the starting weigh of the manual addition is recorded after the scale has been moved.

The manual addition then proceeds as normal.

image

Once complete the operator is presses continue to register the amount dispensed.

image

If the next material is manual then the process repeats. If it is to be dispensed from a valve then the user is prompted to push the scale back in.

image

Once the scale is in, the operator presses continue and the next material is dispensed automatically.

Friday, 14 November 2014

Setting Dispense Vessel Parameters


Overview

ColorPoint checks that the correct dispense vessel is on the scale before starting as dispense. To aid detecting that the correct vessel is on the scale, a number of parameters are set for each vessel size.

Below is an example of a dispense vessel:

  • Capacity: 20 Kg
  • Volume: 20 l
  • Minimum Empty Weight: 0.8 Kg
  • Maximum Empty Weight: 1.0 Kg
  • Nominal Weight: 0.85 Kg
  • Lid Weight: 0.1 Kg
  • Default Vessel for Head


Capacity

The maximum weight the vessel can hold. This is also used to identify your vessel, and for overflow calculations.

Volume

The maximum volume your vessel can hold. This is used for overflow calculations.

Minimum and Maximum Empty Weight

The minimum and maximum weight a vessel of this type should weigh. This is used to detect that the vessel you have selected to use is the vessel on the scale. If an empty 20 Kg vessel is placed on the scale, it must weigh between 0.8 and 1.0 Kg, otherwise the “Wrong Vessel On Scale” icon will be displayed:

clip_image001

It is important that the range of weight between the minimum and maximum empty weight is kept as small as possible, as this makes handling the vessel more accurate. It is also important the vessels weight ranges do not overlap, e.g. a 25 Kg vessel with a weight range of 0.9 to 1.1 kg could be confused with the 20 Kg vessel and incorrectly detect the 20 Kg capacity as 25 Kg, allowing the user to potentially overfill the vessel.

Nominal Weight

The nominal weight defaults to the mid-point between the minimum and maximum empty weight, but may be different. It should be set to the value that you expect a brand new empty vessel to weigh. This value is used as the vessel weight in situations where the original empty vessel weight is unknown, e.g. booking in a return without the original dispense data.

Lid Weight

This value helps to accurately determine the weight of returned ink in a vessel. The lid weight is used if returns are booked in with the lid on. If returns are booked in before the lid is put on, set the value to 0 Kg.

Default Vessel For Head

This setting is only used on multi head dispensers where the scale size differs between heads, e.g. 300 Kg on Head 1 and 35 Kg on head 2. It is used to override the vessel selection when a vessel to large for the scale is selected. Setting this in other situations has no effect and it can be ignored.


Other Useful Information

No vessel on scale

When the scale weight is below 0.1 Kg the no vessel on scale warning icon will be shown.

clip_image001[4]

If you see this icon and there is a vessel on the scale, it is possible that the scale was zeroed while the vessel was on the scale, especially if the vessel was on the scale when the system was started.

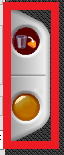
Unknown Vessel On Scale

If the vessel on the scale does not match the weight range of any know vessel, the unknown vessel icon is displayed.

clip_image001[6]

This often indicates the the vessel on the scale is not empty, and that the top-up function should be used.

Vessel Overfill

This icon indicates that the amount selected is too large for the vessel selected.

clip_image001[8]

This often indicates the the vessel on the scale is not empty, and that the top-up function should be used.

Tuesday, 19 August 2014

Import Validation Tool


The tool can be downloaded from here
The Excel template can be downloaded from here
The layout of the tool can be seen as follows:
Capture
This tool includes features listed below:
  • Validation of Materials and Formulas in CSV files.
  • Automated validation of Materials and Formulas in Excel files.
  • Detailed error description of invalid records.
  • Generate blank Material and Formula template.
  • Export valid data to CSV files from Excel files.
The list of error messages are listed below:
  • Code missing or too long (maximum 25 characters)
  • Name missing or too long (maximum 50 characters)
  • Missing materials from formulas

Validate from CSV

Press ‘Choose File’ button and choose the CSV file you want to validate. First choose a Material file and the records will be automatically registered. If the materials are not valid then error messages will be displayed. If the materials are all valid then continue the operation pressing the ‘Choose File’ button again to choose the Formula file.
Valid records are displayed in the table ‘Valid Records’ and invalid records are displayed in the table ‘Invalid Records’. When going through the rows of Invalid Record table, you will be able to see the detailed error description underneath the same.
Capture2
Capture1

Validate from Excel

Click ‘Choose File’ button and choose the Excel file. This will check if all the records are valid. Valid records are displayed in the table ‘Valid Records’ and Invalid records are displayed in the table ‘Invalid Records’. When an invalid record is selected from the table, you will be able to see the detailed error description below the table.
When all the records are valid, it will ask you to save the Materials and Formulas to a CSV file. Press save to save them in your preferred directory.
Capture5
Capture6

Generate File

If you want to create a CSV file with the Materials and Formula file template, click ‘Generate File’ button and save them in your preferred directory.

Thursday, 14 August 2014

Setting Dispense Parameters for a Material


When a material is attached to a dispense valve, the tolerance and pump settings associated with that valve are used to control the dispense performance.

The pump settings are HIGH and LOW pressure. HIGH pressure controls the pump speed in full flow and LOW pressure controls the pump speed in low flow and during spitting. If the HIGH setting is too high the dispenser may over dispense. If the setting is too low, the pump may stall and fail to pump any material.

Generally the HIGH setting should be greater than the LOW setting unless advised by a Rexson engineer.

The tolerance settings are UNDER, ALARM and %. % tolerance comes into effect on dispenses larger than 1 kg. % tolerance works the same for amounts above or below the requested amount and is usually set to 1%.

In smaller dispenses UNDER determines the largest amount that the dispensed amount can deviate below the requested amount and still be in tolerance. ALARM determines the largest amount that the dispensed amount can deviate above the requested amount and still be in tolerance. On a water based ink system, these settings are usually the same at 0.005 kg for colours and 0.020 kg for non-colour products. Some strong colours may require smaller tolerances of 0.002 kg.

If the UNDER tolerance is set to 0.020 kg, any request for less than 0.020 kg of material will be seen as in tolerance, so no material is dispensed. This is the correct behaviour for absolute tolerances.

To set the tolerances and pressures you will need a supervisor (level 3) or engineer/master (level 4) RFID key.

From the Main Menu go to Configuration


image

then Operations

image

From here you can view the settings for each dispense valve

image

Using the arrow buttons on the bottom right of the screen, select the valve number for the material you wish to adjust. The material name and code will be displayed next to the valve number.

Press the Pump/Tank button to change pump pressures.

image

After making changes press the Save button to save the settings and write them to the controller.

Press the Tolerance button to change tolerances

image

After making changes press the Save button to save the settings and write them to the controller.

Tuesday, 29 July 2014

Enabling Local Formula Editing on CPC


When CPC is used along with CPM, the local editing controls are disabled. This allows the formula database to be controller from CPM providing a better editing experience for the user.

When CPC is used stand alone, it is possible to accidentally disable local editing if the user has a master key.

To enable local editing again, go to Configuration:

image

Then System:

image

Then check the CP Manager setting:

image

When local editing is disabled, there is a tick, as above.

When local editing is enabled, there is a cross, as below:

image

If this setting is disabled and you have a CPM installation, all database synchronisation will stop. It is therefore not recommended to disable this setting unless you are instructed to do so by a member of Rexson support.

If you have a standalone console and you cannot see the editing controls on the formulations screen, as below:

image

Then the CP Manager setting will be incorrectly set, and needs to be disabled.

Friday, 16 May 2014

Why Have Our Batch Numbers Changed?

Some customers have noticed on newly updated software that the format of the Dispense/Return Batch Number has changed.

The old format was Dyydddxxx:

  • D – batch number type: dispense
  • yy – year
  • ddd – day of year (1 – 365)
  • xxx – dispense number for the day

The new format is DyyddNxxx

  • D – batch number type: dispense
  • yy – year
  • dd – day of year using 0-9 and A-I
  • N – dispenser number.
  • xxx – dispense number for the day

This new format allows us to support multiple dispensers on a single installation of ColorPoint Manager by identifying the originating dispenser in the batch number. It also does not increase the length of the batch number. This is important where we print the batch number on labels as a barcode.

Monday, 28 October 2013

Adding a New Formula on ColorPoint Console


This procedure only applies if you don’t have a management PC. To add new formulas on systems with ColorPoint Manager see Create a new Formula on ColorPoint Manager

Go to the formulas page.

Press the Add button (with a + icon)

Add-formula-button

Choose a colour from the selection. Give the formula a unique code and a descriptive name.

Code-Name-Color

Use the arrow keys to select a material and press the add button to add it to the formula.

Add-material

Then enter the parts per 100 for this material, followed by the ‘Next’ button.

Enter-parts

Repeat his for each material until the formulation is complete. If a mistake is made, the ‘Edit’ and ‘Del’ buttons can be used to change or remove materials. The arrow buttons on the lower edge of the screen can be used to navigate the list of materials already added to the formula.

When you are finished creating the formula press the ‘Save’ button.

Save-formula

Wednesday, 28 August 2013

Replacing the material on a dispense valve on CPC


If a material is retired and replaced with another material, it will be necessary to remove the original material from the dispense valve and assign a new material.

This guide assumes that the new material has been created on either CPM or CPC and has a code of NewMaterial. The material to be replaced has a code of OldMaterial.

Insert a Master Key (Level 3)

From the Main Menu press the Configuration button.

ConfigurationButton

On the configuration page press the Operations button.

OperationsButton

On the operations page use the arrows to scroll to the valve the old material is assigned to.

DeassignValve

Press the de-assign valve button. You will prompted with a warning. Press yes. The assign material button will now appear. Press it to choose a new material.

AssignValve

When presented with the list of available manual materials, use the arrows to select the new material, the press the select button.

SelectNewMaterial

Your new material is now assigned to the valve.

Complete

Check your pressure and tolerance settings if the properties of the new material differ from the old material.

You may need to perform a material replacement in your formulas if the new material is to replace all uses of the old material. For instructions see this article.

Tuesday, 28 August 2012

Adding Returns Using Barcode Scanner

Booking returns into CPC using a barcode scanner is the simplest and most efficient method of booking in returns. To use this method you need printed dispense labels containing a barcode of the dispense batch number and a barcode scanner.

ReturnsList

Go to the Returns screen from the main menu. This screen automatically intercepts any scanned barcodes and checks if they are dispense batch numbers.

Place the vessel on the scale and scan the barcode of the product to return. If the barcode is recognised as a valid dispense batch, the Add Return screen will be displayed as below:

ReturnAdd

The details of the dispense will be completed automatically, including the original dispense vessel empty weight, the formula code and job number (if the original dispense was booked to a job). The total scale weight will be read and the net return weight will be calculated based on the original empty vessel weight.

Enter a return location if required.

Press the Save button. You will be prompted to print a return label if required.

You will be returned to the main returns list ready to book in another return.