Wednesday 8 January 2020

Recycle Options Page - Category colours explained


Applies to:
CPC version 1.9.78 and greater
 

The Recycle Option page lists all Returns that can be used against the formula to be dispensed.  If the Return can cover one or more of the materials in the formula and doesn’t contain additional materials not in the formula, it will be displayed.  The Return doesn’t have to be for the same formula as the one to be dispensed.

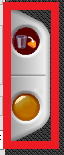
Returns are categorised by colours.

Indicates that the Return is attached to a valve on the dispenser
Indicates that the whole quantity of Return will be used in the dispense. The operator is offered the choice to dispense the formula directly into the Return vessel.
This category only appears if a specific threshold has been configured. This category indicates that after the dispense the amount of Return remaining is less than or equal to the configured threshold. This means that the Return remaining can be scrapped as it is too small a quantity to put back on the shelf.
Only a part of the Return can be used in the dispense.  There will still be content left in the vessel to use in the future.

Friday 2 August 2019

New Console Feature - Tank Batch Tracking


We've added new features to make it easier to monitor how long batches have been on a tank and provide warnings if the batch is approaching or has passed its expiry date.

 Configuring expiry dates

On ColorPoint Manager, add the "Shelf Life" attribute against a material and set its value to the number of days this batch will expire after being opened and attached to a valve.

Monitoring Batch Expiry

On the main page of ColorPoint console, a new button will be shown. When no batches are expiring, it will appear as below:


When there are one or more batches which are going to expire soon, it will appear as below:


When there are one or more batches which have expired, it will appear as below:


Pressing on the button will take you to the Vessel Contents page. Here, the expired or expiring batches will be highlighted with different colored text for the amount of time they have been on the tank, orange is expiring soon, red is expired.
The information field can optionally be set to show the date the batch was assigned to the tank or the batch number of the batch that is on the tank.

Friday 19 July 2019

New Console Feature - System Health Checks

Dispenser downtime due to hardware or computer failures can be costly to your production, so we have introduced new features which will proactively warn the operator if it detects issues that may in future cause a problem.

The result of health checks are surfaced on the main menu when you first log in:

 The "heartbeat" icon in the top left will show green if no issues have been detected, orange if there are issues which could cause downtime further down the line, red if there are issues that could cause problems in the near future.

Pressing on the icon will take you to the Health page which shows the below information:


Last Boot: How long the system has been up since last boot
Version: Version of the software that is currently running.
Printer: Where CPC is configured to send Print Files.

Network: Shows all network adapters, their MAC addresses and current IP addresses. Connected adapters show in green, disconnected ones in red.

Health:

Disk Space: Shows the health of disk partitions, green if Ok, orange if running low on space, red if critically low.
File Maintenance: Offers early detection of build-up of Log or Print Files which indicate the normal automatic maintenance routines require attention.
Backup: Shows number of automated backups that are detected. Red if there are none, Orange if less than 3, green if more than 3.

Friday 5 July 2019

X-Rite IFS - Corrections with a job number


Can I send a correction via X-Rite to the ColorPoint console and link it to a job?


Yes it is possible by sending the job number with the formula code.
The formula code sent over in the Correction file needs to be of the following form

04798~2~00490
This breaks down as:
[job number]~[job item order]~[formula code]

The tilde ~ is the separator character.

The job item order part is the number where that formula appears in the list of items for the job.
In the example above the formula code 00490 is the formula being sent as a correction.  If the job is viewed in ColorPoint Manager then formula 00490 is item 2 in the job items list.


If formula 00440 was being sent instead then the formula code to be sent would look like
04798~3~00440

The job number remains the same but the formula code and its position have changed.

Tuesday 18 June 2019

ColorPoint Console - Toggle how Return is dispensed


When using a Return in a dispense, if one of the Returns can be used entirely the system asks whether you wish to use the Return vessel as the dispense vessel. 


If Yes (the tick button) is selected then an icon appears on the left of the dispense screen.


This icon indicates that the Return vessel is being used.  The dispense is set as a top up and all other materials will be dispensed on top of the existing Return.

If the operator wishes to pour the Return into another vessel instead then they can click on the button next to the icon and it will change to a different icon of the Return being poured. 


The dispense changes from a top up to a regular dispense and the manual dispense symbol appears next to the Return.


Summary

Use the Return vessel and top up all materials into this vessel
Use an empty vessel and pour the Return into it


Monday 24 October 2016

New Console feature : Stop Weight


Following customer feedback, we have added a new feature to the console which allows the operator to define a Stop Weight. This is a weight value set against a tank. When the tank weight is at or below this weight OR the dispense you are trying to make will take the weight below this level, the dispense will be prevented until the tank weight is above the Stop Weight.

The main use case for this feature is to provide a “hard stop” to prevent stock from going below an acceptable minimum level. This is useful in scenarios where strict stock control is in place and the stock must never go below a defined amount, generally zero, however there is sometimes the need to ensure there is a minimum amount of stock in the tank that is above zero.

The feature is used as below:

To access the setting, go to the Supply Vessel Contents page (M005), select the desired tank and click Edit. You will see the below screen:

image

The default value of Stop Weight is not set, which means that dispensing will never be stopped regardless of weight. This behaviour is how the console worked prior to this feature being added.

To set it, just select the field and enter a weight using the on-screen keyboard:

image

Once this has been set, if an attempt is made to dispense while the tank is below this weight or where the requested dispense amount will take the tank below the set amount, the stop icon will appear in the warning panel:

image

To proceed with dispensing, go to Supply Vessel Contents page and refill the tank so it is above the Stop Weight level. Dispensing will then be permitted to continue as normal.


This feature is available in version 1.9.34 and higher. If you are under a support contract that includes software updates, you can get this update for free by contacting support@rexson.co.uk.

If you are not under a support contract, contact sales@rexson.co.uk for a quote.

Monday 23 May 2016

Splitting a dispense or issue between multiple jobs


It is sometimes desirable to take a dispense or issue that has been booked against one job and re-allocate part of it against a different job, for instance if there is material left in a press sump that you want to allocate to the next job to run.

Below are instructions to carry out this action:


There are two different options to split a Dispense or Issue.

Split to matched jobs


Will only allow splitting to jobs that have the formulation that was in the dispense or issue.

Split


Will allow booking to any job even if it does not contain the dispensed formulation.

 Clicking either option will summon the below dialog:


You click the Add button to add the jobs and screens that you wish to split the dispense between.

There are 3 options for splitting

Manual – User enters how much should go in each job.

Estimated – Set the weight for each job to the remaining estimated for that job.

Weighted Estimate – Allocate the dispense between selected jobs proportionally based on the estimated requirements for each job.


Click


to remove a job from the dialog.