Wednesday 16 February 2011

Exporting Data and Performing Backups on ColorPoint Console


This post applies mainly to standalone CPC dispensers.


There are two methods of saving your data from CPC. Use an export when you wish view the data exported, or change it and import it again. Use a backup when you want to be able to recover the whole system in event of a failure.


Exporting Data

To Export data you need to be a level 3 user.

From the Main Menu page go to:

  • Configuration
  • Import-Export

You will see a summary of the material and formula data on your system.

  • Go to Export
  • Select the items of data you wish to export. By default al data is exported.
  • Press Export
  • The data is saved to the Export USB drive in the \ExportFiles folder.
  • The file name is [Console name]-[DateTime]-[type].csv,
    • e.g. CPC-14461-001-201102161559-formulation.csv
    • e.g. CPC-14461-001-201102161559-manualmaterial.csv
    • e.g. CPC-14461-001-201102161559-automaterial.csv

See the section "Accessing your data" for the next step.


Backups

A database backup is more comprehensive than an export. It contains details of your user accounts and their key codes, as well as any internal settings.All new ColorPoint Consoles have automatic backups scheduled on a daily basis. On some older systems this feature wasn't available. Please contact Rexson Support if you would like to check the status of automatic backups on your console.

To make a backup of your database you will need to be a level 3 user. Go to

  • Configuration
  • Backup/Restore

You will see a summary of the data on your system.

  • Press Backup
  • The backup will be stored on the Export USB drive in the \BackupFiles folder.
  • The file name is ColorPoint_Full_Date_Time.bak
  • If automatic backups are scheduled on your system there may be 7or more of these files, along with some other internal backups
    • The automatic backup system keeps the last 7 days backups in a rotation.


Accessing your Data

To access the data on the USB drive do the following:

  • Switch off the console using the power button on the front of the panel.
  • Open the side panel of the console cabinet. On hazardous systems this will cause the unit to lose pressure and will require purging afterwards.
  • Locate the ColorPoint embedded controller, near the centre of the panel.
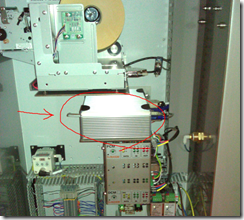
  • moz-screenshot-1
  • Locate the export USB drive on the left of the controller
    • On early models with 2 USB drives
      • this will be a white USB drive in the upper slot.
      • or a silver USB drive labelled "Export" in the upper slot
    • On later models with a single USB drive this is the only drive.
  • Remove the USB drive and connect to your computer
  • Copy the contents of ExportFiles and/or BackupFiles
  • Replace the USB drive taking care to insert it the right way up.
  • Close the cabinet and power on the console.

Using Lists and Searching on ColorPoint Console


The Formula and Job pages of CPC have the facility to navigate through their lists an item at a time, a page at a time and by searching the codes or names of the items.

Navigating

To the right of the lists on the job and formula pages are the navigation buttons.

image

From top to bottom they are:

  • Previous item
  • Previous page
  • Next page
  • Next item

The navigation buttons “wrap around”. So pressing the previous page button when on the first page will take you to the last page and pressing previous item when on the first item will take you to the last item. Similarly, next page or item on the last page or item will take you to the first.

Searching

The main buttons to use when searching are these:

image

The left button is “Search”, the right button is “Clear Search”. Pressing “Clear Search” at any time reverts the list to all jobs or formulas in the database.

Pressing “Search” takes you to the search page.

image

Pressing the “? Code” or “? Name” button toggles between searching in the code of name for the text you enter. The search field preference will be remembered for your next search.

The text you enter is searched for anywhere in the code or name field. So typing “12” would match formulas “12”, “120”, “0012” and “ABC 12”.

Pressing the “Clear” button clears the search text.

On the left the image button allows you to step through the list of your last 10 searches allowing frequently used searches to be re-used without re-typing them.

The counter in the centre of the screen shows how many records will be returned by your current search. When you have narrowed the number of results returned down, press the select button image to apply your search to the list.


Wednesday 2 February 2011

Adding a New Material on ColorPoint Console


This procedure only applies if you don’t have a management PC. To add new materials on systems with ColorPoint Manager see Create a new material on ColorPoint Manager


Adding a material direct to a valve

  • Insert an ID key of level 2 or above.
  • Press ‘Material’ on the Main Menu screen.
  • Using the arrow keys clip_image002 clip_image004 scroll up or down to the valve number you wish to assign the material to. The selected valve number row will turn white.
  • Press clip_image006 (bottom of screen).
  • Press ‘Assign Colour’ (right of screen).
  • Using arrow keys clip_image008 clip_image010 scroll up or down to the row you want. Then select the colour by pressing the keys at the bottom of the column your colour is in.
  • Press clip_image012 top right.
  • Press ‘Code’. The text field will change colour, from orange to red.
  • Now you can enter the material code using the virtual keyboard. Using the same method you did when selecting the colour, scroll up and down the rows using the arrow function keys to the right of the keyboard. Once you have the correct row, you can select the character you require by pressing the key at the bottom of the column character is in.
  • clip_image014
  • Press ‘Name’. The text field will change colour, from orange to red.
  • Enter the material name using the same method as you did to enter the code.
  • Once complete press clip_image016.


Adding a manual material

  • Insert an ID key of level 2 or above.
  • Press ‘Material’ (right of screen).
  • Press ‘Manual Material’ at the bottom of the screen.
  • Then follow the above procedure from Press clip_image006[1].


Assigning a manual material to a valve

  • Insert an ID key of level 3.
  • Press ‘Configuration’ (top right of screen).
  • Press ‘Operations’ (second from top on the right of screen).
  • Use the arrow keys on the bottom right to scroll up and down to the valve number required. There are to hidden keys on the bottom row at the right that scroll up and down by 10 valves at a time to make navigation quicker.
  • Press ‘Assign Material’ on the bottom left of the screen.
  • Select a material from the list of manual material to assign to the valve.

Add or Edit a User on ColorPoint Console

  • Insert a Master Key in to key holder.
  • Press clip_image002 (top right)
  • Press clip_image004 (top right).
  • Press User (bottom right).
  • To edit an existing user
    • Using the arrow keys (bottom right) highlight the user/key you wish to change.
    • Press ‘Edit’.
    • Once on the ‘Edit’ page you can change the user name.
    • Note: NEVER change the key code number of an existing user unless you have been instructed to do so by Rexson support personnel.
    • To change the user level press the ‘Access Level 1-3’ key to until you arrive at the required level.
    • Press ‘Save’ (top right).
  • To add a new user
    • Press ‘Add’.
    • Enter the use name.
    • Enter the key code supplied with the key.
    • To change the user level press the ‘Access Level 1-3’ key to until you arrive at the required level.
    • Press ‘Save’ (top right).
  • Check the user details are correct in the master list.
  • Press ‘Exit’ until you are back on the main menu page.
  • Remove the Master Key for security..

An Introduction to ColorPoint Console

ColorPoint is a gravimetric dispensing system.

The most basic system comprises of a computerised dispense control console, a weighing platform and a dispense head which is attached to the pump frame.

The pumps and dispense valves are operated by pneumatic control signals from there relevant control modules.

The console is operated using Rexson’s unique ATM style console. The console has no keyboard or mouse and the user-friendly graphical software is navigated by simply pressing the appropriate buttons as required.

ColorPoint allows access to the following main menus:

  1. Dispense
  2. Materials
  3. Formulas
  4. Press Returns
  5. Stock/inventory

The console is accessed by the operator using individual ‘ID keys’. These can be set to different access levels. The ID key also allows traceability (with CPM).

In addition to the basic system, there are a number of optional extras you can have in order to make dispensing and administration easier.

  • ColorPoint Manager Software (CPM).
  • Link to Spectrometer.
  • Link to business system.
  • Barcode scanner.
  • Console label printer.
  • Pail mixer (manual or auto)
  • Conveyor system.

The most common system is the basic Console with CPM and a label printer. This allows the operator and the administrator to run the ColorPoint dispense system efficiently.


ColorPoint Console

Common Keys & Icons

clip_image002[4] Exit (top left) exit the page you’re in.

clip_image004[4] Help (top left) gives you a description of what each key does on the screen you’re in.

clip_image006[4] Return

clip_image008[4] Issue

clip_image010[4] clip_image012[4] Delete

clip_image014[4] clip_image016[4] Edit

clip_image018[4] clip_image020[4] Add

clip_image022[4] Copy

clip_image024[4] Search

clip_image026[4] Clear Search

clip_image028[4] clip_image030[4] Select

clip_image032[4] Save

clip_image034[4] clip_image036[4] Scroll up or down the page.

clip_image038[4] clip_image040[4] Scroll to next page.

clip_image042[4] Virtual keyboard.


Using the keys

All of the keys and icons are self-explanatory in their functions, however you do need to know what to press and when.

To use any of the function keys you must press the outer screen key clip_image044[4] adjacent to the function you wish to use, not on the on-screen icon itself.

If you need to enter information in the text field, you must first highlight the box so that it turns from orange to red.

This is done by pressing the clip_image044[5] adjacent to the text field. You can also use this key for backspace/delete to clear the original text or a mistake.

Once you have highlighted (red) the text field, you can enter your information using the virtual keyboard and colour palette.

You scroll up and down the rows using the arrow function keys to the right of the virtual keyboard.

Once you have the correct row, you can select the character you require by pressing the key at the bottom of the column character is in.

clip_image046

Repeat the process until all the information has been entered.

Operating on Selected List Items on ColorPoint Manager


Another powerful tool is right-clicking on a selected item or items. Whenever a list is displayed it is possible to right-click on a selection to perform related actions.

Removing Categories

In the following example three materials have been tagged with a custom category ‘To Reformulate’ to identify items I need to work on. I have now finished with the task and want to remove the category. I do this selecting the items I want to change by holding down the ‘Ctrl’ key and clicking each item in turn. Right-clicking on the selection produces the menu shown below.

clip_image001

Clicking on ‘Remove Category’ produces the following tool providing a list of available categories to remove:

clip_image002

clip_image003

Clicking ‘Ok’ removes the categories from the selection.

Send to Dispense Queue

Any material or formula may be sent directly to the dispense queue on CPC by right-clicking and selecting ‘Send to dispense queue…’

clip_image004

The screen area is disabled and a dialogue box appears requesting details of the required dispense:

clip_image005

After entering the weight required, and adjusting the number of repetitions clicking ‘Ok’ adds the request to the end of the queue.

Create Job

Designs are templates for new jobs. To create a job choose the design, right-click and select ‘Create Job’. This opens a new job, prefilled with the details of the chosen design and ready to be given a unique job number and run length. Once created the values provided by the design may be overridden if required.

Job Lifecycle
Release Job

This releases a job for dispensing.

Un-release Job

This is used to stop a job from being used, generally when changes need to be made to the job. If changes are made to a job without un-releasing and releasing again, the changes will be ignored by CPC.

Complete Job

Mark a job as complete. This removes the job from the active job list, removes it from the CPC job list and indicates that no further work will be done on this job.

Other Actions

The following is a list of other actions that may be invoked by right-clicking on either a single item or a selection.

Open

This opens an item for editing. This has the same result as double-clicking on it.

Delete

An item may be deleted if it is not referenced anywhere. The delete option will appear disabled if this is not true.

Report

This provides a list of available reports for the item. The contents of the list will vary depending on the options enabled in your installation.

Scrap Return

When a return is below a usable weight, or otherwise unfit for further use it may be marked as scrapped. This prevents it from being used in remixing on CPC and being displayed on the list of returns.

Finish (Material Batch)

When a material batch is below a usable weight, or is otherwise unusable it may be marked as finished. This prevents it from being assigned when refilling a tank on CPC. Note: this will not remove the batch from CPC if it is currently assigned. To do this, refill the tank on CPC selecting a new batch.

Filtering and the Filter Panel on ColorPoint Manager


The filter panel is one of the most powerful parts of CPM. Using the various search fields it is possible to narrow down a large list of items to a small selection making it easy to find individual items.

Basic Filtering

To display the filter panel click the ‘Filter’ button on the navigation toolbar:

clip_image001

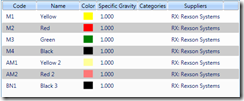
Here is a list of materials, unfiltered:

clip_image002

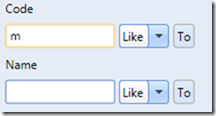
Typing ‘m’ into the code entry area of the filter panel filters the list to any codes that contain the letter m, in upper or lower case anywhere in the code:

clip_image003

This has removed the entry ‘BN1’ from the list.

clip_image004

Expanding the search further to filter on items containing ‘m1’ results in the following list:

clip_image006

Reverse Filtering

Changing the search type from ‘Like’ to ‘Not Like’ reverses the search, showing only items that do not contain an ‘m’.

clip_image008

Exact Matches

Changing the search type from ‘Like’ to ‘=’ changes the result to an exact match only.

clip_image010

Matching Ranges

Finally, a range of items may be searched by entering the starting search, in this case ‘a’, pressing the ‘To’ button and then entering the ending search. Please note the search excludes the last item in the search range, so that searching ‘a’ to ‘c’ gives items beginning with ‘a’ and ‘b’, but not c.

clip_image012

Checking the Exclude box reverse the search and removes these items from the results:

clip_image014

The same principles apply to searching across date ranges, price ranges and dispense weight ranges.